

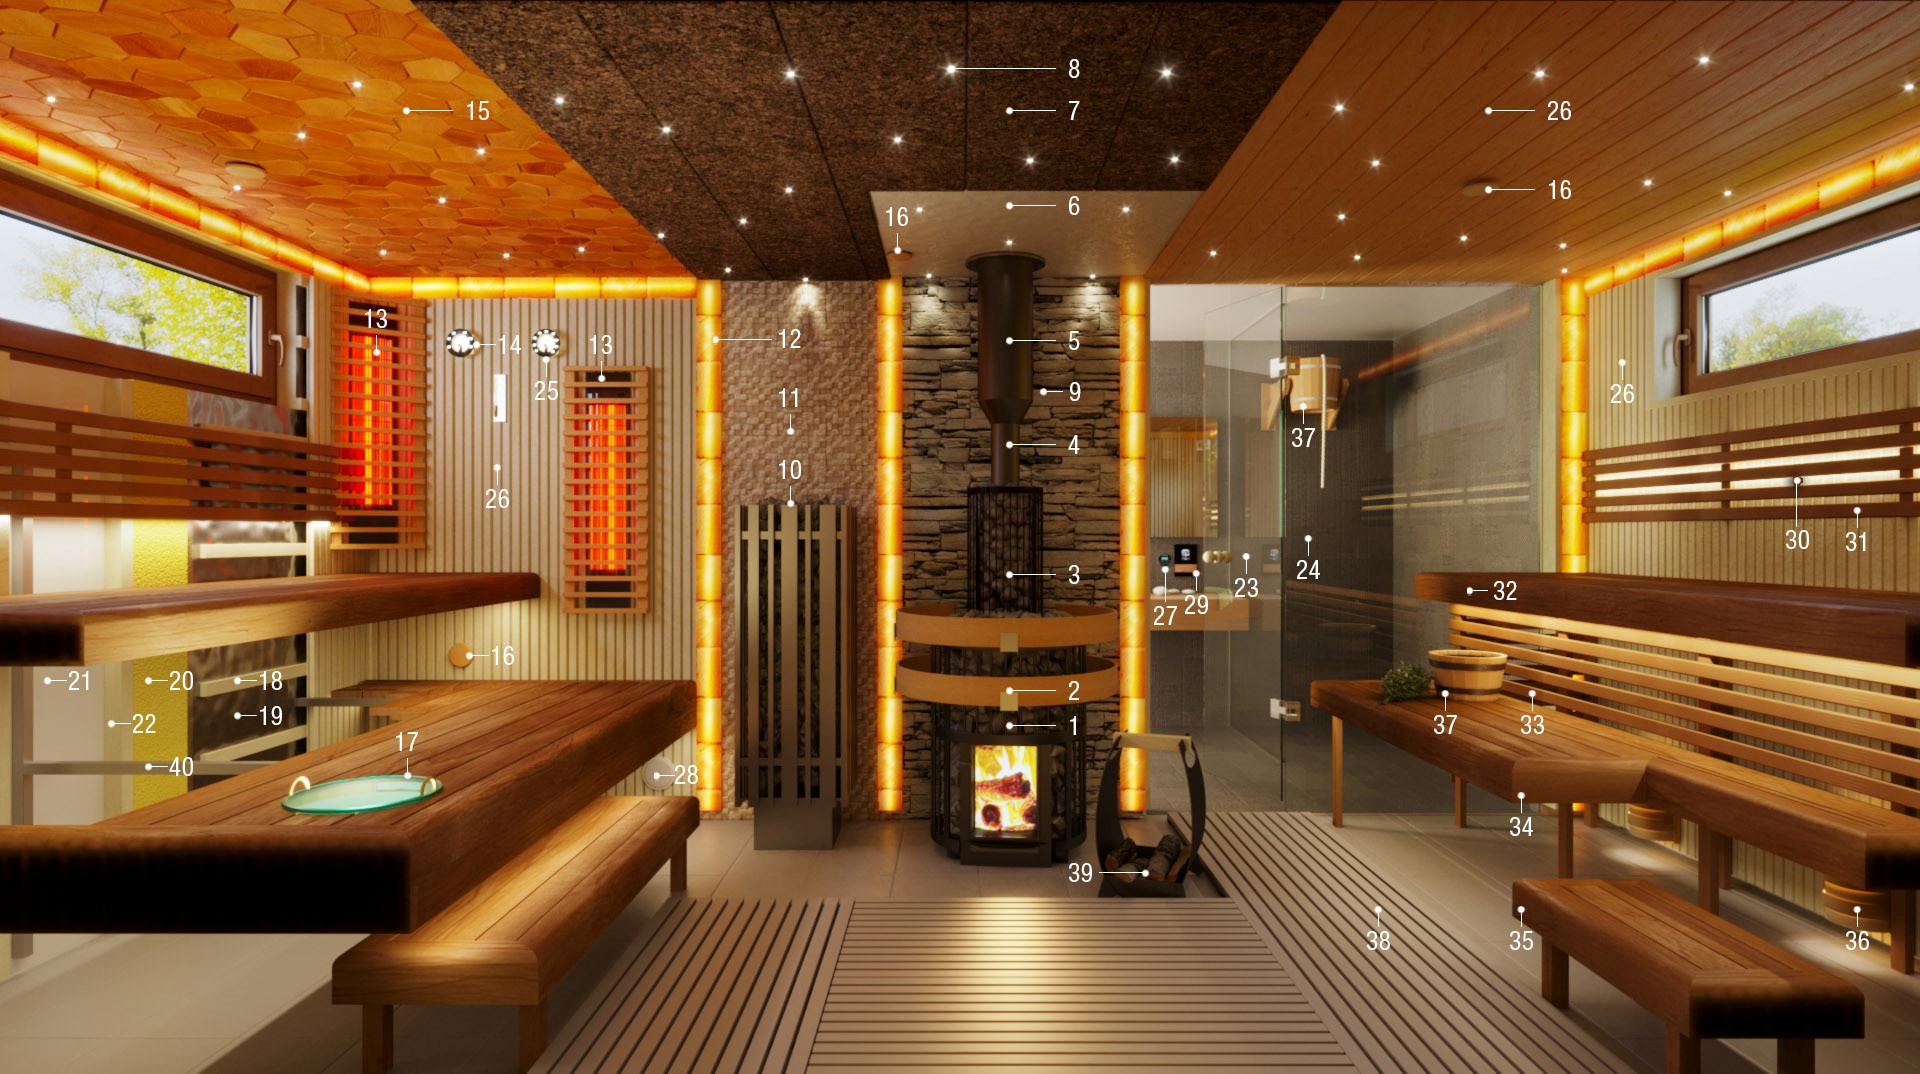
SAUNA EQUIPMENT AND POSSIBILITIES
The illustration shows the entire set of modern saunas.
The links will take you to our store where you can see the prices.
-
- 1. Woodburning stove
- 2. Guard ring
- 3. Nets around the smoke pipe
- 4. Smoke pipe
- 5. Modular chimney
- 6. Insulation materials
- 7. Termo cork
- 8. Sauna light
- 9. Decorative stones
- 10. Electric heater
- 11. Decorative stones
- 12. Salt bricks
- 13. IR Sauna Equipment
- 14. Timers
- 15. Wooden panels
- 16. Ventilation
- 17. "Cariitti" Accessories
- 18. Frameworks
- 19. Insulation materials
- 20. Insulation slab
Building sauna is easy!
This article sets out the basic outline of the structure and stages of building sauna by yourselves. Some examples of sauna projects are given here. You can follow your preferences while viewing our range of products at www.saunainter.com and making the necessary list based on these key items:
-
Electric Heater. Model (basic or with steam function), mode of control (built-in or remote), capacity, power cable, sauna stones, mounting (wall-mounted or floor-mounted).
Firewood Heater. Model (fired from inside or outside of the sauna), capacity, specifications for chimney connections, chimney system, sauna stones.
-
Door. Model, size, right-hand side or left-hand side, door trims.
-
Wall and ceiling material. Type of wall lining, material, dimensions, fixing clips, L-bars.
-
Benches. Board type, material, dimensions or modular benches.
-
Additional materials. Frames, rails, heat insulation, folium paper, aluminum foil tape.
-
Lightning. Type (ceiling-mounted, wall-mounted, LED band), adaptor, power cable, mode of control (with RGB colored lighting).
-
Accessories. Thermometer, bucket and ladle, aroma fragrances, wood protection oil, MP3 player, audio speakers.
Fill the basket with the products of your choice to see their price and terms of delivery at once.
Planning

For a sauna, choose dry, well-ventilated room in the house or separate facility. The sauna should be sized as follows: about 2.5 - 3 m3 of total volume per person. The inside height should be 2,100-2,300 mm.
Walls and ceiling of the room may be built of stone blocks, gypsum boards and/or wooden boards. The floor may be finished with ceramic tiles. A floor drain is also recommended.
When choosing the model of the electric and/or firewood heater, please read the manual very attentively or consult with our support service.
Having chosen the electric heater as the source of heat, please make sure what power in kW may your mains supply and what type the power supply is, 220 V or 380 V, single-phase or three-phase power.
Having chosen the firewood heater as the source of heat, make sure it can be connected to the existing chimneys or find out if a new chimney may be built. Consult the local fire department.
In most cases the heater is placed in the corner on the same side as the door. Sauna door must open outwards.
In accordance with existing safety regulations, electric wiring and installations must be performed by a professional and certified electrician. Also, any and all works associated with installation of firewood heaters and chimneys must be performed by a professional and certified specialist.
We recommend you to use our sauna design and technical planning service. After completing the questionnaire you will receive a technical layout, drawing and 3D images of your sauna within 4-6 days.
If you are not afraid of construction tools and materials and have some experience, everything will be just fine! As soon as you've chosen the place, you may start the construction!
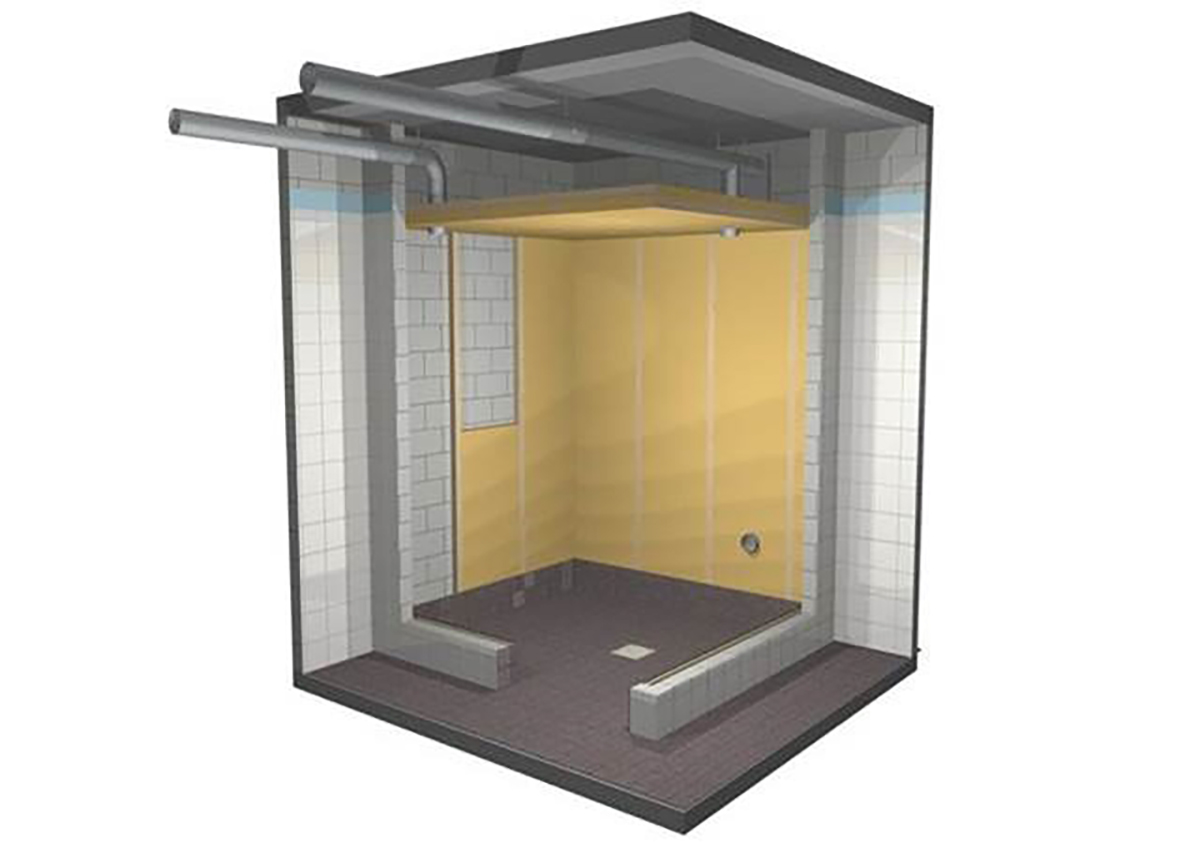
Ventilation

A sauna with good ventilation will have an excellent air exchange and will heat up the room more rapidly and evenly. The lifecycle of proper ventilated sauna room is much longer. The materials will not be destroyed by fungus or mold. Only in well-constructed and properly ventilated sauna room, you will have an opportunity to get all the benefits and do well to your health.
-
A. Location of the inlet air valve. If the sauna has natural ventilation, the inlet air valve must be mounted in the lower side of the heater.
A1. If the sauna has the artificial (mechanical) ventilation, the valve must be mounted over the heater, in the wall or ceiling. The diameter of the inlet air ventilation pipe shall be 50-100 mm. Fresh air is best drawn from outdoors.
-
B. Location of the outlet air valve. Mount the outlet air valve as far from the heater as possible on the opposite wall and at the height of 250-400 mm from the floor. The diameter of the outlet air pipe shall be 100 mm or bigger, than the diameter of the inlet air pipe. We recommend using the ready-made rectangular air duct for the outlet air.
-
C. An additional drain valve may be mounted as well. When you are preparing the sauna for visit and starting to heat it up, the valve must be closed at all times. After bathing, the sauna may be dried by opening the drain valve. Open the drain valve and leave the sauna door open. In each specific case, the design and assembly of sauna ventilation must be customized with reference to the specifications of the heater chosen.
Framework

The frame is the base for the entire sauna. It is normally built of wooden frame lath 45*45 mm.
It may be studded or screwed to the wall, if the wall is made of wood. If walls are uneven, a piece of plywood or regular wood must be placed beneath the frame lath.
The frame lath must be mounted vertically to the wall from the ceiling down to the skirting board. The skirting board is built of gypsum board and finished with tiles. Its height constitutes 50-100 mm, and the skirting board runs peripherally over the entire sauna.
-
Fix the frame laths to the walls tightly. The distance between the vertical laths depends on the width of the heat insulation material. It normally constitutes 500 mm.
-
The top horizontal frame laths must be fixed to the very top of the vertical frame laths.
-
Wire all cables to the respective devices (electric heater, sensors, lighting, audio speakers, etc.).
-
Install the door. Pursuant to the safety rules, the door must open outwards. For better air circulation, the door must be installed to provide a gap of 30-50 mm between the bottom part of the door and the floor.
Heat insulation
Heat insulation of sauna is among the crucial stages which minimizes heat losses and maximizes the lifecycle of wooden structures and heating systems.
If heat insulation is insufficient in the sauna, it has steadily higher humidity: this rots the wooden walls and ceilings and causes the appearance of odor inside the sauna.
-
The clearances between the vertical wall laths must be filled in with heat insulation material with thickness of 50 mm.
-
The thickness of heat insulation material on the ceiling must be at least 100 mm.
-
The ceiling and walls must be thoroughly insulated. Do not allow formation of voids.
-
Lead all cables through the heat insulation to the respective devices (electric heater, sensors, lighting, audio speakers, etc.).
Aluminum paper

The use of aluminum paper ensures rapid heating of the sauna and longer heat retaining against smaller heating cost (Thermos effect).
Folium paper keeps moisture inside the sauna and prevents its penetration inside the wooden structure.
Folium paper must be mounted with the glossy side facing out. It is fixed to the frame with special brackets and foiled adhesive tape.
-
First, put a layer of aluminum paper on the ceiling and fold the remaining parts towards the wall to make the same paper which covers the walls lean tightly to its surface.
-
Then wrap the walls of the sauna into the layers of aluminum paper and fill the seams between the layers with foiled tape.
-
Lead all cables through the aluminum paper to the respective devices (electric heater, sensor, lighting, loudspeakers, etc.).
-
All remaining clearances must be densely covered with aluminum paper and/or foiled tape.
Supports

On this stage of sauna construction you need to place wooden support in advance for the internal structure of the sauna, for the reliable use of all suspended elements (wall lining, benches, electric boiler, etc.).
-
Mount wooden supports for wall lining, size 18 x 45 mm, to the frame laths beneath the ceiling.
-
Then mount the similar wooden supports to the wall-mounted frame laths.
-
Define the height of the benches and mount wooden supports 45 x 95 mm where you plan to mount benches.
-
If you are planning to purchase a wall-mounted electric heater, first mount the support (A) on the wall which will hold the screws to carry the heater. You can use a simple sheet of plywood, as shown in the figure.
Wall lining

Before mounting the lining in the sauna, make sure you decided on its properties and look. The look of the sauna itself depends on how the lining is mounted. It may be mounted vertically or horizontally.
If you mount it vertically, the supports must be mounted horizontally. It is vice versa with horizontal mounting.
-
Start mounting lining from the ceiling. Fix lining to the wooden supports on the ceiling with special fastening clips, also called fixing clips.
-
Then mount lining on the walls.
-
Leave a small 3-5 mm peripheral clearance between the upper edge of the wall lining and ceiling for air circulation within the structure.
-
Drill holes in the lining and lead all cables through them to the respective devices (electric heater, sensor, lighting, audio speakers, etc.).
Installation of additional equipment

-
Mount the framework for the lower bench at the standard height of 600 mm from the floor, and the upper bench at 1,000 mm from the floor.
-
The clearance between the upper bench and the ceiling must be 1,100-1,300 mm.
-
Mount the door trims.
-
Mount the lamp with a protective grill.
-
Mount the ventilation valves.
-
Mount the audio speakers.
-
Use brush to cover the walls and ceiling with an environmentally friendly protection oil.
Benches

The choice of the shape and material of the benches determines the ergonomics and design of the sauna. The size of benches must be calculated with reference to the anticipated number of people who will simultaneously will be visiting sauna. Also, consider the mode of using the bench: lying, reclining or sitting.
The width of the upper bench which is convenient to sit or lay on can be around 600 mm; and the width of the lower bench can be around 300 – 400 mm.
A wooden backrest with the width of about 300 mm is required for comfortable sitting. It must be mounted at the height of 250 mm from the upper bench.
The movable bench is built of the same material as the benches, with the height of 200-300 mm from the floor.
-
Mount the benches on the wall-mounted supports or floor-mounted supporting legs.
-
Mount the wooden backrest and the decorative grill between the benches.
-
Use brush to cover the benches, movable bench, backrest and grill with an environmentally friendly wood protective oil.
Heater

In accordance with existing safety regulations, electric wiring and installations must be performed by a professional and certified electrician. Also, any and all works associated with installation of firewood heaters and chimneys must be performed by a professional and certified specialist.
-
Mount and wire the electric heater or firewood stove pursuant to the manual.
-
If necessary, mount a guard for the heater.
-
Heat the heater for the first time to remove the leftover protective substances and lubricants which might have been splashed on the heater on different construction stages. They may cause odor or even smoke.
-
Ensure proper sauna airing. Due to the odor, it is not recommended to use sauna during the first heating.
In the event of any doubts, do not hesitate to contact our specialist.
The estimated cost and list of products
The estimated cost of materials that are required for a sauna room with the size of 2m x 2m x 2.2m starts from 2500€
Product list:
| Product title | Quantity |
|---|---|
| PINE FRAMEWORK 45 x 45 | 30 pcs |
| PINE FRAMEWORK 45 x 95 | 6 pcs |
| PINE FRAMEWORK 18 x 45 | 36 pcs |
| ROCK WOOL 50mm (9.5m2) | 2 packs |
| ROCK WOOL 100mm (5.5m2) | 1 pack |
| ALUMINIUM PAPER W:1,25 m / L:24 m / 30 m2 | 1 pcs |
| ALUMINIUM TAPE 50m | 1 pcs |
| DISC VALVE Ø - 100 MM | 2 pcs |
| VENTILATION 3-WAY SPLITTER | 1 pcs |
| CORRUGATED ALUMINIUM PIPE | 1 pcs |
| RECTANGULAR VENT HOOD | 1 pcs |
| AD STANDART SAUNA DOOR, 7x20, BRONZE, ASPEN | 1 pcs |
| ASPEN LINING 12x65, 1800mm | 100 pcs |
| ASPEN LINING 12x65, 2100mm | 30 pcs |
| ASPEN LINING 12x65, 2400mm | 30 pcs |
| ALDER BENCH WOOD 28x90mm, 2100mm | 30 pcs |
| HARVIA CILINDRO PC90 | 1 pcs |
| SAUNA STONES | 5 packs |
| HEAT RESISTANT SILICON CABLE 5x2.5 | 2 m |
| SAUNA LAMP | 2 pcs |
| SAUNA LAMP SHADE | 2 pcs |
| ANGLE MOULDINGS, 28 X 28 VA, ASPEN | 4 pcs |
| ANGLE MOULDINGS, 14 X 30 SI, ASPEN | 5 pcs |
| HARVIA PARAFFIN OIL | 1 pcs |
| SUPI SAUNASUOJA | 2 pcs |